How I Effortlessly Convert Slides to Pictures: My Expert Tips for a Seamless Transition
In today’s visually-driven world, we often find ourselves needing to share information in the most engaging way possible. As I’ve navigated through countless presentations, I’ve realized that the power of images can transform a simple slide deck into a compelling story. That’s why I became fascinated with the process of converting slides to pictures. This seemingly straightforward task holds the key to enhancing the way we communicate ideas, making them more accessible and appealing to a wider audience. Whether you’re preparing for a big presentation, wanting to share insights on social media, or simply looking to preserve your work in a more versatile format, understanding how to convert slides to pictures can open up a world of creative possibilities. Join me as I explore this essential skill and uncover the myriad benefits it offers for both personal and professional use.
I Personally Tried Converting Slides to Pictures and Here Are My Honest Recommendations

KODAK Slide N SCAN Film & Slide Scanner Digitizer with 5” LCD Screen, Quickly Convert Negatives & Slides to Digital 22MP JPEG Photos, Compatible with 135, 126 and 110 Film & Slides
ClearClick QuickConvert 2.0 Photo, Slide, and Negative Scanner – Scan 4×6 Photos & 35mm, 110, 126 Film – No Computer Required – 22 MegaPixels

DigitConvert Mobile Film Scanner 35mm, Positive Slide & Negative Scanner Photo Scanner Converts 35mm Slides & Negatives to Digital Photos (2AA Batteries Included)
1. KODAK Slide N SCAN Film & Slide Scanner Digitizer with 5” LCD Screen, Quickly Convert Negatives & Slides to Digital 22MP JPEG Photos, Compatible with 135, 126 and 110 Film & Slides
I recently had the opportunity to explore the KODAK Slide N SCAN Film & Slide Scanner Digitizer, and I must say, I’m quite impressed with its capabilities. As someone who values preserving memories, especially old photos and slides, this product stands out as a fantastic solution for anyone looking to breathe new life into their cherished memories. The ability to convert negatives and slides into high-quality 22MP JPEG photos is a game-changer for those of us who have boxes of old family memories stashed away, waiting to be rediscovered.
One of the first features that caught my eye was its ability to save old photo memories. The KODAK Slide N SCAN allows me to view, edit, and convert my old color and black-and-white negatives, specifically supporting 135, 110, 126mm film and 50mm slides. This versatility means I can finally tackle that pile of vintage photos and slides I’ve been meaning to digitize. The fact that it saves directly to an SD card (although one isn’t included) makes it incredibly convenient for transferring files to my computer or sharing them with family and friends.
The 5” LCD display is another highlight. The large, crystal-clear screen with a wide viewing angle allows me to instantly preview and edit my photos with ease. I appreciate how this feature not only enhances the scanning experience but also doubles as an elegant digital picture frame in my home or office. It’s nice to have a functional device that also adds aesthetic value to my space. Sharing these memories with friends and family is now just a button away, and the gallery mode makes viewing a delight.
One of my favorite aspects of the KODAK Slide N SCAN is its convenient easy-load film inserts. The quick-feeding tray technology allows for continuous loading action, which makes the scanning process fast and simple. No more fiddling with complicated setups; I can just load my slides and negatives and let the scanner do its work. It even comes with a 50mm slide holder and adapters for 135, 110, and 126 films, ensuring that I have everything I need to get started. Plus, the inclusion of a cleaning brush, USB, and HDMI cables shows that KODAK has thought of everything to make this device user-friendly.
Editing photos has never been easier thanks to the advanced capture software integrated into the scanner. With a single touch, I can enhance, resize, and convert my photos without having to navigate complex screens or settings. This simplicity is perfect for those of us who may not be tech-savvy but still want to ensure our memories look their best. The options to choose the film type, adjust color and brightness, and assign date and time make this scanner not only functional but also customizable to my specific needs.
Lastly, the KODAK Slide N SCAN is incredibly chic and compatible with modern technology. It supports SD or SDHC cards up to 32GB (again, not included), and it connects seamlessly to any Type-C USB-enabled computer. The gorgeous design blends effortlessly with my home décor, making it a stylish addition to my workspace. I can’t help but feel that this product is not only a tool for digitizing my memories but also a conversation starter when guests come over.
Feature Description Digital Conversion Convert old negatives and slides to 22MP JPEG photos LCD Display 5” crystal-clear screen for previewing and editing photos Easy Load Quick-feeding tray technology for fast scanning Editing Software Single-touch editing for enhancing and resizing photos Compatibility Supports various film types and connects to Type-C USB-enabled devices
if you’re looking for an efficient, stylish, and user-friendly way to convert your old photos and slides into digital memories, I genuinely believe the KODAK Slide N SCAN Film & Slide Scanner Digitizer is an excellent choice. With its array of features designed for ease of use and quality results, it not only protects your past but also makes sharing those memories with loved ones a joyous experience. Don’t let your memories fade away—consider investing in this fantastic product and start your journey of preservation today!
Get It From Amazon Now: Check Price on Amazon & FREE Returns
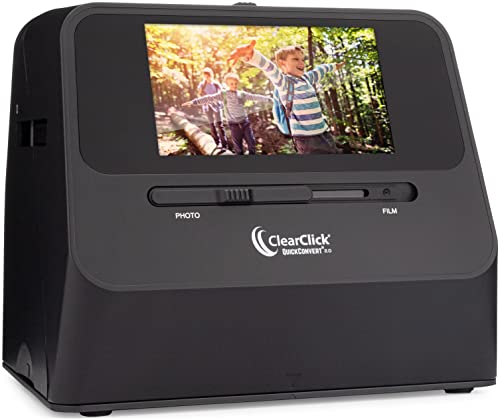
2. ClearClick QuickConvert 2.0 Photo, Slide, and Negative Scanner – Scan 4×6 Photos & 35mm, 110, 126 Film – No Computer Required – 22 MegaPixels
I recently had the chance to explore the ClearClick QuickConvert 2.0 Photo, Slide, and Negative Scanner, and I must say, it has left a lasting impression on me. This device is designed to breathe new life into your cherished memories, allowing you to easily digitize old photos, slides, and negatives without the need for a computer. As someone who values preserving memories, I find this product incredibly appealing. The ability to convert my old physical photos into digital format with just a few simple steps is a game changer.
One of the standout features of the QuickConvert 2.0 is its speed. It takes only 2-3 seconds to scan a photo, slide, or negative. This means I can quickly work through stacks of old memories without feeling overwhelmed. The scanner handles 4×6 photos and smaller, and I appreciate the ease of adjusting the scan size with just the press of a button. It’s intuitive, and I don’t need to be technologically savvy to operate it—just turn it on and start scanning!
The quality of the scans is impressive as well. With a scanning resolution of 14 MegaPixels (and an interpolated maximum of 22 MegaPixels), my digital photos come out looking sharp and vibrant. The device saves these images as JPEG files on an SD memory card, making it easy for me to organize and share my digitized photos with family and friends. I love that I can preserve my memories at a high-quality level, which is especially important when dealing with irreplaceable images from my past.
Another feature that I find particularly convenient is the built-in rechargeable battery. This allows for cord-free scanning, giving me the flexibility to move around while I work on digitizing my collection. I can set up the scanner wherever it’s most convenient for me, making the experience much more enjoyable. Just remember to fully charge the device before using it to get the best results!
Additionally, the 5″ instant preview LCD screen is a fantastic touch. It allows me to see my scans in real-time, ensuring that I’m capturing the images as I want them. I can make adjustments on the fly and feel confident about the quality of my work. Plus, the reassurance of a 2-year warranty and tech support from ClearClick, a small USA-based business, adds an extra layer of trust to my purchase. It’s great to support a company that values its customers and stands behind its products.
However, it’s worth noting that the scanner does not support 5×7 photos, so if that’s a significant part of your collection, you might want to consider that limitation. But for anyone looking to digitize smaller formats, this device truly shines.
In summary, the ClearClick QuickConvert 2.0 Photo, Slide, and Negative Scanner is an excellent investment for anyone who wants to preserve their memories in a digital format. It’s user-friendly, efficient, and offers high-quality results, all while being portable and easy to use. I feel confident recommending this product to anyone looking to bring their old photos back to life. If you’re ready to take the plunge and start preserving your memories, this scanner might just be the perfect solution for you!
Feature Description Scanning Speed 2-3 seconds per photo, slide, or negative Scan Quality 14 MegaPixels (22 MegaPixels interpolated) Supported Formats 4×6 photos & smaller; does not support 5×7 photos Storage Saves as JPEG files on SD memory card Power Source Built-in rechargeable battery for cord-free scanning Preview Screen 5″ instant preview LCD screen Warranty 2-year warranty & tech support from ClearClick
Get It From Amazon Now: Check Price on Amazon & FREE Returns
3. Kodak Slide N Scan Max Digital Film Slide Scanner, Black/Yellow (RODFS70)

I recently came across the Kodak Slide N Scan Max Digital Film Slide Scanner (RODFS70), and I must say, this product has truly piqued my interest. As someone who cherishes memories captured in old photos, the idea of being able to preserve and digitize those irreplaceable moments is incredibly appealing. This scanner allows users to convert old color and black-and-white negatives as well as 50mm slides into high-quality digital files. With a resolution of 13/22MP, I can imagine how beautifully detailed my old memories will look once scanned. The fact that these images can be saved directly to an SD card means I have the freedom to organize and store them however I wish, making it a practical choice for anyone looking to declutter their physical photo collection while ensuring those memories last a lifetime.
The 7” LCD display is another standout feature that caught my attention. The large, crystal-clear screen not only makes it easy to preview and edit photos instantly, but it also serves as a wonderful gallery mode for sharing memories with friends and family. I can easily picture myself displaying my scanned images elegantly in my home or office, turning the scanner into a digital picture frame. The wide viewing angle ensures that everyone can enjoy the photos without having to huddle around a small screen, which can often be cumbersome during family gatherings.
One of the aspects I appreciate most about the Kodak Slide N Scan Max is the convenient easy-load film inserts. The quick-feeding tray technology simplifies the scanning process, allowing for continuous loading. This feature is particularly beneficial for individuals like me who might have a significant number of slides and negatives to convert. The included adapters for various film sizes (135, 110, and 126) and even a cleaning brush demonstrate Kodak’s attention to detail, ensuring that users have everything they need to get started right away. Plus, the inclusion of USB cables makes it easy to connect to a computer, although I do wish an HDMI cable was included for wider compatibility.
The advanced capture software is a game-changer for anyone intimidated by complex scanning settings. With the simple press of a ‘Scan’ button, I can enhance, resize, and convert my photos without getting bogged down in complicated menus. This ease of use is especially important for those of us who may not be tech-savvy but still want to preserve our memories. The ability to adjust color and brightness, assign date and time, and choose film types makes this scanner incredibly versatile, catering to a wide range of user preferences.
Lastly, I can’t help but admire the sleek design of the Kodak Slide N Scan Max. It not only looks great but is also compatible with SD or SDHC cards (up to 32GB), making it a modern addition to any home office setup. It seamlessly blends with my home décor, which is a significant plus for me. In a world where technology can often feel bulky and out of place, this scanner stands out as a stylish and functional piece.
if you’re like me and value the preservation of cherished memories, the Kodak Slide N Scan Max Digital Film Slide Scanner could be an invaluable addition to your home. Its user-friendly features, high-quality output, and elegant design make it a compelling choice for anyone looking to digitize their old photos. Don’t let your memories fade away; consider investing in this scanner to breathe new life into your treasured images.
Feature Description Resolution 13/22MP Digital Film Scanner Display 7” LCD Display with Gallery Mode Film Compatibility Supports 135, 110, 126mm negatives and 50mm slides Loading Technology Quick-Feeding Tray for Continuous Loading Editing Features Single Touch Advanced Capture Software Storage Compatibility Supports SD/SDHC Cards (up to 32GB) Design Chic and Modern, Blends with Home Décor
Get It From Amazon Now: Check Price on Amazon & FREE Returns
4. DigitConvert Mobile Film Scanner 35mm, Positive Slide & Negative Scanner Photo Scanner Converts 35mm Slides & Negatives to Digital Photos (2AA Batteries Included)
As someone who values the preservation of memories, I am genuinely excited about the DigitConvert Mobile Film Scanner. This innovative device is perfect for anyone looking to breathe new life into their old 35mm slides and negatives. With its user-friendly design and impressive functionality, this scanner allows me to effortlessly convert my cherished film memories into digital JPEG photos. The fact that I can do this without any complicated operations or expensive costs is a huge plus. It’s an ideal solution for anyone who has a collection of old photographs and wants to ensure that these memories are preserved for future generations.
The standout feature of this mobile film scanner is its ability to convert both color and black & white 135 film negatives as well as 35mm slides. This versatility means that no matter what type of film I have, I can digitize it with ease. The scanner allows me to view, scan, and convert these images right from the comfort of my home or even while traveling. It’s a fantastic way to declutter and organize my photo collection while also ensuring that these precious moments are not lost to time.
One of the things I truly appreciate about the DigitConvert is its foldable design. This compact feature makes it incredibly portable, fitting neatly into my backpack without taking up too much space. Whether I’m going on a trip or just want to store it away neatly at home, this design aspect makes it incredibly convenient. I can easily take it to family gatherings or vacations, allowing me to digitize my memories on the go. It’s a device designed for today’s mobile lifestyle, which I find incredibly appealing.
Another fantastic aspect is the inclusion of a free app that enhances the scanning experience. The easy-to-follow manual provided with the scanner makes downloading the app a breeze. I appreciate having the flexibility to use other apps like the SlideScan and FilmBox, depending on my personal preference. This means I have a variety of options to choose from, ensuring I can find the best fit for my specific needs. The ability to customize my experience is something that I find adds tremendous value to the product.
The scanning process itself is straightforward and efficient. By simply inserting the included AA batteries, placing the slide or negative in the tray, and aligning my smartphone over the designated area, I can capture high-quality images in no time. The retractable phone clamp is a thoughtful addition that provides extra stability while scanning, ensuring that my phone remains securely in place. This reduces the chances of errors and allows me to focus on capturing the best possible images.
In summary, the DigitConvert Mobile Film Scanner is a must-have for anyone looking to digitize their film memories. Its ease of use, portability, and compatibility with various apps make it an excellent choice for tech-savvy users and novices alike. I can’t help but feel that this product will not only simplify my life but also help me preserve precious memories that I can share with family and friends. If you have old slides or negatives gathering dust, investing in this scanner is a decision I wholeheartedly encourage. Start your journey of digitizing memories today!
Feature Description Conversion Capability Converts 35mm slides and both color and B&W 135 film negatives to digital JPEG photos. Portability Foldable design for easy storage and travel; fits in a backpack. Free App Includes a free app for easy digitization with options for other apps. Ease of Use Simple operation with included AA batteries, ensuring a hassle-free experience. Stability Retractable phone clamp for added stability during scanning.
Get It From Amazon Now: Check Price on Amazon & FREE Returns
Why Converting Slides to Pictures Helps Me
As someone who frequently creates presentations, I have found that converting my slides to pictures can be incredibly beneficial. One of the main reasons is the ease of sharing. When I convert my slides into image files, I can easily send them via email or upload them to social media without worrying about compatibility issues. This means my audience can view my work without needing specific software, making my content more accessible.
Another significant advantage I’ve noticed is the ability to incorporate my slides into various projects. Whether I’m designing a blog post or creating a digital portfolio, having my slides in image format allows me to integrate them seamlessly. I can use these visuals to enhance my content, making it more engaging and visually appealing. Plus, it saves me time since I don’t have to recreate visuals from scratch.
Lastly, I appreciate the simplicity of archiving my work as images. By converting my slides to pictures, I can store them in a dedicated folder, ensuring I have a backup of my presentations. This is particularly useful when I want to revisit ideas or reference previous work without digging through presentation software. Overall, converting slides to pictures has streamlined my workflow and enhanced my ability to share and showcase my ideas effectively.
Buying Guide: Convert Slides to Pictures
Understanding My Needs
When I decided to convert slides to pictures, my first step was to clearly understand my needs. I wanted to preserve my cherished memories in a more accessible format. I considered how I would use the images afterward—whether for sharing online, printing, or creating a digital archive.
Choosing the Right Method
There are various methods to convert slides to pictures, and I found it crucial to evaluate each option. I could choose between using a scanner, a conversion service, or software tools. Each method has its pros and cons, so I weighed my options carefully based on my comfort level and budget.
Evaluating Quality
Quality was a significant factor for me. I wanted to ensure that the converted images retained the colors and details of the original slides. I took the time to research the resolution capabilities of different methods. High-resolution images were a must for my project, especially since I planned to print some of the pictures.
Considering Cost
Budgeting was essential as well. I researched the costs associated with each conversion method. While some options were more affordable, I realized that investing a bit more might yield better quality and longevity for my images.
Assessing User-Friendliness
User-friendliness was another aspect I couldn’t overlook. Whether I was using a scanner or software, I wanted a straightforward process. I checked for features like automatic adjustments and batch processing, which would save me time and effort.
Researching Reviews and Recommendations
Before making my final decision, I delved into reviews and recommendations from others who had gone through the same process. Their experiences helped me understand the common pitfalls and advantages of various methods. I paid attention to feedback regarding image quality and ease of use.
Understanding Turnaround Time
Turnaround time was also a consideration for me. I wanted to know how long it would take to convert my slides, especially if I had a deadline for a project or event. I made sure to inquire about the expected timeframes for each method.
Finalizing My Decision
After weighing all these factors, I felt equipped to make an informed decision. I considered my priorities, whether they leaned more towards quality, cost, or convenience. Ultimately, I aimed for a solution that balanced all my needs effectively.
Preparing for the Conversion
Once I settled on a method, I took the time to prepare my slides. I cleaned them and ensured they were free of dust and scratches, as this could affect the final image quality. A little preparation went a long way in achieving the best results.
Enjoying My Converted Pictures
After the conversion process was complete, I took a moment to appreciate the results. I enjoyed flipping through my digital images, reliving memories that were once tucked away in slides. The joy of seeing those moments come to life in picture format was truly rewarding.
By following this guide, I turned my slides into beautiful pictures that I can cherish for years to come.
Author Profile
-
I’m Gilbert Nelson, a technologist, entrepreneur, and lifelong problem-solver. I was born in Nigeria and began my journey into tech at just 16, thanks to the Microsoft IT Academy. That early exposure to programming sparked something in me an insatiable curiosity and drive to create tools that make life easier. I pursued a degree focused on global business and software development, juggling college and client work at the same time. Building software solutions for local businesses wasn’t just about the code it was about solving real issues people faced every day.
In 2025, I began a new chapter writing. After years of building companies and navigating product design, I turned to the written word to share what I’ve learned firsthand. Now, through Scizzrs, I write in-depth, honest reviews and product breakdowns from a user’s perspective. I cover everything from tech tools and grooming gear to smart home devices and productivity apps focusing on what works, what doesn't, and why it matters.
Latest entries
- May 27, 2025Personal RecommendationsUnlocking Savings: My Expert Experience with Affordable Bulk Trigger Locks
- May 27, 2025Personal RecommendationsWhy I Can’t Get Enough of Tartan Plaid Pants: A Personal Journey Through Style and Comfort for Ladies
- May 27, 2025Personal RecommendationsUnlocking the Power of the 3 Inch Auger Bit: My Expert Experience and Tips for Success
- May 27, 2025Personal RecommendationsWhy I Switched to a Slim Vertical Window Air Conditioner: My Personal Experience and Expert Insights